How to use Dive to optimize your Docker images

Docker is a popular tool for creating and deploying containerized applications. However, one of the challenges of using Docker is managing the size of your images. Large images can take longer to build, push, pull, and run, and can also consume more disk space and network bandwidth.
One way to reduce the size of your Docker images is to use Dive, a tool that allows you to explore the contents of your images and their layers, and discover ways to shrink them. Dive analyzes your Dockerfile and shows you how much space each instruction adds to your image, and how much of it is wasted or duplicated. Dive also lets you interactively browse the files and directories in each layer, and see how they differ from the previous ones.
In this blog post, I will show you how to install and use Dive to optimize your Docker images.
Installing Dive
Dive is available as a binary for Linux, macOS, and Windows. The full installation instructions are in Dive's repository, but you can also use the following for Linux:
Ubuntu/Debian
export DIVE_VERSION=$(curl -sL "https://api.github.com/repos/wagoodman/dive/releases/latest" | grep '"tag_name":' | sed -E 's/.*"v([^"]+)".*/\1/')
curl -OL https://github.com/wagoodman/dive/releases/download/v${DIVE_VERSION}/dive_${DIVE_VERSION}_linux_amd64.deb
sudo apt install ./dive_${DIVE_VERSION}_linux_amd64.deb
RHEL/Centos
export DIVE_VERSION=$(curl -sL "https://api.github.com/repos/wagoodman/dive/releases/latest" | grep '"tag_name":' | sed -E 's/.*"v([^"]+)".*/\1/')
curl -OL https://github.com/wagoodman/dive/releases/download/v${DIVE_VERSION}/dive_${DIVE_VERSION}_linux_amd64.rpm
rpm -i dive_${DIVE_VERSION}_linux_amd64.rpm
Arch Linux
Available in the extra repository and can be installed via pacman:
pacman -S diveUsing Dive
To use Dive, you simply need to run the dive command followed by the name or ID of the image you want to analyze. For example, to analyze the ubuntu:20.04 image, you can run:
dive ubuntu:20.04
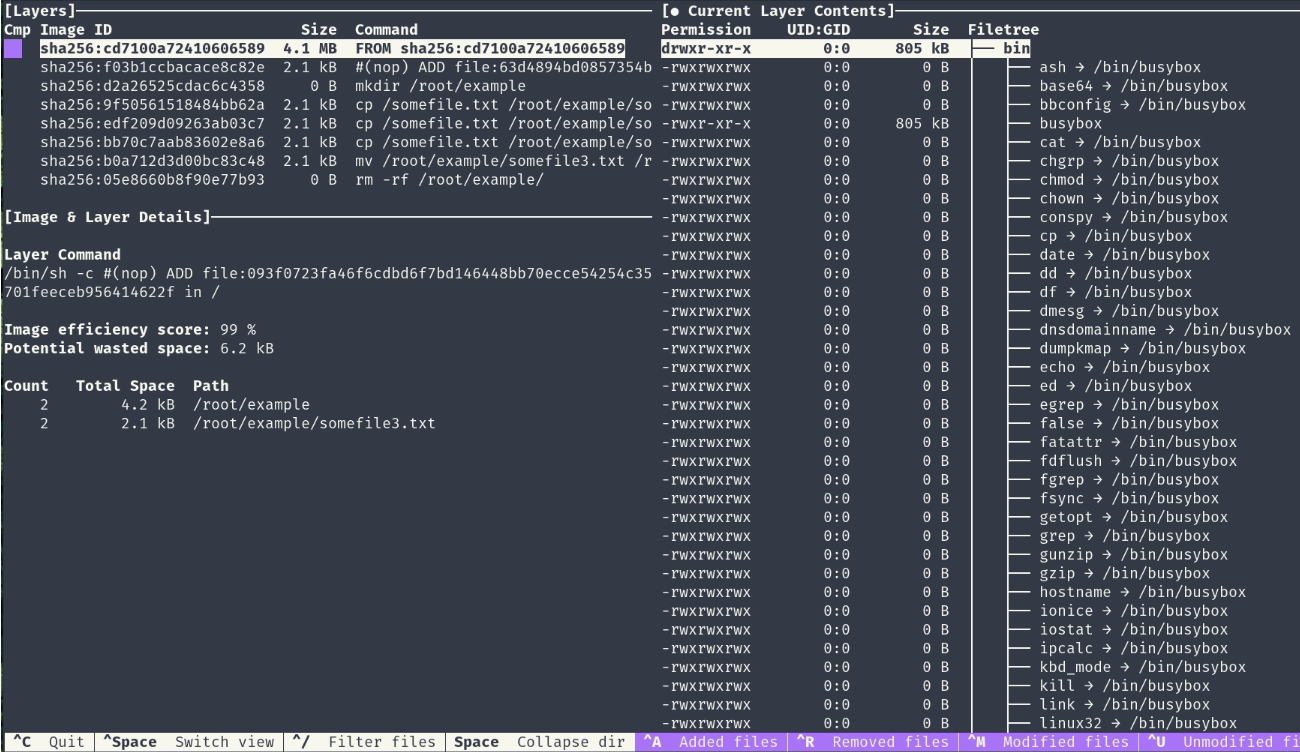
This will launch the Dive interface, which consists of three main panels:
- The Layers panel shows the list of layers in your image, along with their size, ID, and the Dockerfile instruction that created them. You can use the arrow keys to navigate through the layers, and press
Enterto select a layer. - The Current Layer Contents panel shows the tree view of the files and directories in the selected layer, along with their size. You can use the arrow keys to expand or collapse the directories, and press
Enterto select a file or directory. - The bottom panel shows the diff view of the selected file or directory, comparing it with the previous layer. You can use the arrow keys to scroll through the diff, and press
Tabto switch between the panels.
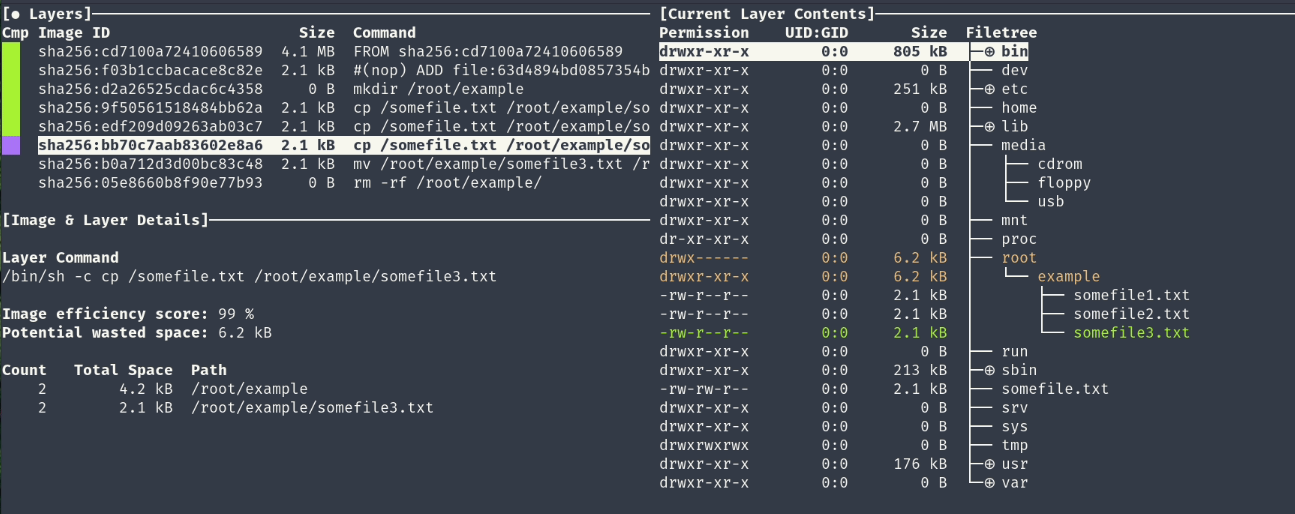
In the interface, you can see some useful information and metrics about your image, such as:
- The image ID and size
- The efficiency score, which measures how much space is wasted or duplicated in your image
- The wasted space, which is the amount of space that is not shared with other layers or is not used by the final container
- The number of files and directories in your image
- The number of added, modified, and deleted files and directories in each layer
You can use these metrics to identify the layers and files that contribute the most to the size of your image, and look for ways to optimize them. For example, you can:
- Combine multiple
RUNinstructions into one, using&∨to separate the commands, to reduce the number of layers and avoid intermediate files - Use multi-stage builds to copy only the necessary files from one stage to another, and discard the rest
- Use
.dockerignorefile to exclude unnecessary files and directories from your build context - Use
--no-install-recommendsor--no-install-suggestsoptions when installing packages withapt-get, to avoid installing unnecessary dependencies - Use
--squashoption when building your image, to merge all the layers into one, and remove any unused files - Use
docker image pruneordocker system prunecommands to remove unused images, containers, networks, and volumes
You can also use the Ctrl+F shortcut to search for a file or directory in your image, and see which layer it belongs to, and how it differs from the previous layer. You can use the Esc key to exit the search mode.
To exit the Dive interface, you can press Ctrl+C or q.
 Markus
Conclusion
Dive is a handy tool for exploring and optimizing your Docker images. It helps you to understand how your images are built, and how to reduce their size and improve their efficiency. You can use Dive to inspect any image, whether it is built by you or pulled from a registry, and get useful insights and suggestions for improvement.
Markus
I hope you found this blog post useful, and learned something new about using Dive. If you have any questions or feedback, please feel free to leave a comment below. Thank you for reading! 😊