How to speed up Docker image builds


Docker is a powerful tool for creating and running containers, which are isolated environments that can run applications and services. Docker images are the building blocks of containers, and they contain all the files and dependencies needed to run an application.
 Markus
However, building Docker images can be a time-consuming process, especially if you have a large or complex application. Every time you make a change to your Dockerfile or your source code, you have to rebuild the entire image from scratch. This can slow down your development and testing workflow, and waste your resources.
Fortunately, there are ways to speed up the image building process by using the build cache (and some other tips and tricks related to it). Docker cache is a feature of Docker that allows you to reuse the intermediate layers of an existing image, instead of rebuilding them every time. This can significantly reduce the time and bandwidth required to build your images.
In this blog post, I will show you how to use the build cache effectively, and share some best practices for writing Dockerfiles that optimize the use of the cache.
Markus
What is the build cache and how does it work?
The build cache is a mechanism that Docker uses to store the intermediate layers of an image, and reuse them when possible. Each layer of an image corresponds to an instruction in the Dockerfile, such as FROM, RUN, COPY, or CMD.
When you build an image, Docker executes each instruction in the Dockerfile, and creates a new layer for the result. Docker then checks if there is an existing layer in the cache that matches the current instruction. If there is, Docker reuses that layer, instead of creating a new one. If there is not, Docker creates a new layer and adds it to the cache.
The build cache is local to your machine, and it is stored in the /var/lib/docker directory by default. You can view the contents of the cache by using the docker image history command, which shows the layers and the commands that created them.
The build cache is also sensitive to the order and the content of the instructions in the Dockerfile. If you change the order or the content of an instruction, Docker invalidates the cache for that instruction and all the subsequent ones. This means that you have to rebuild those layers from scratch, which can take longer and consume more resources.
Therefore, to make the most of the build cache, you should follow some best practices for writing Dockerfiles, which I will discuss in the next section.
How to layer your Dockerfiles?
Layering Dockerfiles is the process of writing Dockerfiles that create multiple layers for your image, each corresponding to an instruction in the Dockerfile. Layering Dockerfiles can help you optimize the use of the cache, as well as the size and performance of your image.
However, not all layers are equally cacheable or reusable. Some layers may change more frequently than others, or depend on the previous layers. If you change the order or the content of an instruction, Docker invalidates the cache for that instruction and all the subsequent ones. This means that you have to rebuild those layers from scratch, which can take longer and consume more resources.
Therefore, to use the cache effectively, you should follow some best practices for layering Dockerfiles, such as:
- Use official Docker images for better security and performance.
- Start with a minimal base image that has the minimum number of layers and dependencies needed to support your application. Such as
slimor even better,alpineimages. - Group related instructions together, and order them from the least frequently changed to the most frequently changed.
- Use the
COPYinstruction instead of theADDinstruction, unless you need to extract a compressed file or fetch a remote URL. - Avoid using the
RUNinstruction to execute multiple commands in a single line, unless they are related and have a common purpose. - Use the
--no-cacheflag when building your image, if you want to force Docker to ignore the cache and rebuild the image from scratch.
An example
As an example of a badly layered nodejs app, consider the following Dockerfile:
FROM node:21
WORKDIR /app
COPY . .
RUN npm install
RUN npm run build --prod
This Dockerfile copies the entire source code before installing the dependencies, which is bad for caching. The reason is that any change to the source code will invalidate the cache for the COPY instruction and the RUN instructions, and force Docker to reinstall the dependencies and rebuild the application from scratch.
A better way to write this Dockerfile is:
FROM node:21
WORKDIR /app
COPY package.json package-lock.json ./
RUN npm ci
COPY . .
RUN npm run build --prod
This Dockerfile copies the package.json and package-lock.json files before installing the dependencies, so that the npm ci step can be cached if those files don’t change. Then, it copies the rest of the files and runs the build command. This way, any change to the source code will only affect the last two layers, and not the dependency installation layer.
Installing packages in multiple layers
One of the common mistakes when writing Dockerfiles is to install packages in multiple layers, instead of grouping them together. This can result in larger image sizes, slower build times, and wasted resources.
FROM ubuntu
RUN apt install -y curl
RUN apt install -y wget
This Dockerfile creates a layer for each RUN instruction, which is unnecessary and inefficient. Each layer adds some overhead to the image size, and also invalidates the cache for the subsequent layers if any of the previous layers changes.
better way to write this Dockerfile is:
FROM ubuntu
RUN apt install -y \
    curl \
    wget
This Dockerfile creates only one layer for the RUN instruction, which reduces the image size and the build time. It also makes the cache more effective, as any change to the RUN instruction will only affect one layer.
Avoid copying unnecessary files
Another common mistake when writing Dockerfiles is to copy unnecessary files from the host to the image, instead of using a .dockerignore file. This can result in larger image sizes, slower build times, and security risks.
For example, consider the following Dockerfile:
FROM python:3.9
WORKDIR /app
COPY . .
RUN pip install -r requirements.txt
RUN python setup.py install
This Dockerfile copies the entire source code directory from the host to the image, which may include files that are not needed for the application, such as tests, documentation, configuration files, etc. These files add extra weight to the image size, and may also expose sensitive information, such as credentials, keys, tokens, etc.
A better way to write this Dockerfile is:
FROM python:3.9
WORKDIR /app
COPY .dockerignore .dockerignore
COPY requirements.txt ./
RUN pip install -r requirements.txt
COPY . .
RUN python setup.py install
This Dockerfile uses a .dockerignore file to exclude the files that are not needed for the application, such as tests, documentation, configuration files, etc. This way, only the relevant files are copied to the image, which reduces the image size and the build time. It also protects the sensitive information from being exposed in the image.
The .dockerignore file should contain the patterns of the files and directories that should be ignored by the COPY and ADD instructions. For example, a possible .dockerignore file for a Python application could be:
# Ignore tests
tests/

# Ignore documentation
docs/

# Ignore configuration files
*.ini
*.json
*.yml

# Ignore cache files
__pycache__/
*.pyc
*.pyo
*.pyd

# Ignore git files
.git/
.gitignore
Avoid unnecessary dependencies from package managers
We often install dependencies into our images from package managers like npm, pip, apt, apk, etc. for Node, Python, Debian, and Alpine images. But we should be careful about what dependencies we are installing and if they are really needed in our final image. Sometimes, package managers install extra dependencies that are not needed, which can make our image bigger and slower.
We can use some tricks like --no-install-recommends to avoid package managers installing additional dependencies that are not needed:
# Use the ubuntu base image
FROM ubuntu

# Update the package list and install curl
RUN apt update -y && \
    apt install -y --no-install-recommends \
    curl

# Clean up the apt cache
RUN apt clean && \
    rm -rf /var/lib/apt/lists/*
It also cleans up the apt cache to reduce the image size.
Use multi-stage builds
Sometimes dependencies are only needed for building our application, but not for running it; in those cases, we can use multi-stage builds to avoid having them in our final image. A multi-stage build allows us to have multiple FROM instructions in our Dockerfile, and copy only the necessary files from one stage to another. This way, we can reduce the size and complexity of our final image.
For instance, if we are building a Node.js application, we may have a Dockerfile like this:
FROM node:18 as build
WORKDIR /app
COPY package.json package-lock.json ./
RUN npm ci
COPY . .
RUN npm run build --prod

FROM node:18-alpine
WORKDIR /app
COPY --from=build /app/dist ./dist
EXPOSE 3000
CMD ["node", "dist/index.js"]
This Dockerfile uses two stages: the first one to build the application, and the second one to run it. The first stage uses the node:18 image, which has all the tools and dependencies needed to build the application. The second stage uses the node:18-alpine image, which is smaller and faster, and only copies the dist folder from the first stage. This way, we can reduce the number of layers and the size of the final image.
If your app consists of a server that serves a UI, consider adding:
- A build stage for building the backend
- A build stage for building the UI
- A final stage for combining the two into a single package (such as a server serving static resources)
Use optimized base images
We've discussed layering, but there's even more methods to optimize your Docker images!
Base images are the starting point for building your Docker images. They provide the operating system and the essential packages that your application needs to run. However, not all base images are created equal. Some base images are larger, slower, or less secure than others. Therefore, choosing the right base image for your application can make a big difference in the performance, size, and security of your final image.
One way to optimize your base images is to use smaller and faster base images, such as ‘slim’ and ‘alpine’ builds. These base images are based on minimal Linux distributions, such as Debian and Alpine, that only include the bare necessities for running your application.
For example, the node:12-alpine image is only 39.2 MB in size, whereas the node:12 image is 345 MB in size. Similarly, the openjdk:11-jre-slim image is only 204 MB in size, whereas the openjdk:11-jre image is 624 MB in size.
To use optimized base images for node or openjdk, you need to follow these steps:
- Find the appropriate base image for your application from the official Docker Hub repositories, such as
nodeoropenjdk. For example, you can use node:18-alpine to get the alpine variant of the node 18 image, or openjdk:11-jre-slim to get the slim variant of the openjdk 11 image. - Use the base image as the first instruction in your Dockerfile, using the
FROMkeyword. For example,FROM node:12-alpineorFROM openjdk:11-jre-slim. - Add the rest of the instructions in your Dockerfile, such as
WORKDIR,COPY,RUN, etc. to customize your image and install your application. You may need to install some additional packages or dependencies that are not included in the base image, using the package manager of the base image, such asaptfor Debian orapkfor Alpine. - Build and test your image, using the
docker buildanddocker runcommands. You can use thedocker imagescommand to check the size of your image, and compare it with the original base image.
Here is an example of a Dockerfile for a node application:
# Use the node:18-alpine base image
FROM node:18-alpine

# Set the working directory to /app
WORKDIR /app

# Copy the package.json and package-lock.json files
COPY package.json package-lock.json ./

# Install the dependencies
RUN npm ci

# Copy the rest of the files
COPY . .

# Build the application
RUN npm run build --prod

# Expose the port 3000
EXPOSE 3000

# Run the application
CMD ["node", "dist/index.js"]
Here is an example of a Dockerfile for a Java application:
# Use the openjdk:17-jre-slim base image
FROM openjdk:11-jre-slim

# Set the working directory to /app
WORKDIR /app

# Copy the jar file
COPY target/my-app-1.0-SNAPSHOT.jar ./my-app.jar

# Expose the port 8080
EXPOSE 8080

# Run the application
CMD ["java", "-jar", "my-app.jar"]
Use Dive to analyze Docker images
Dive is a tool for exploring a docker image, layer contents, and discovering ways to shrink the size of your Docker/OCI image1. It analyzes your Dockerfile and shows you how much space each instruction adds to your image, and how much of it is wasted or duplicated. It also lets you interactively browse the files and directories in each layer, and see how they differ from the previous ones.
You can use Dive to inspect any image, whether it is built by you or pulled from a registry, and get useful insights and suggestions for improvement. You can install Dive on Linux, macOS, or Windows, or run it as a Docker container.
Markus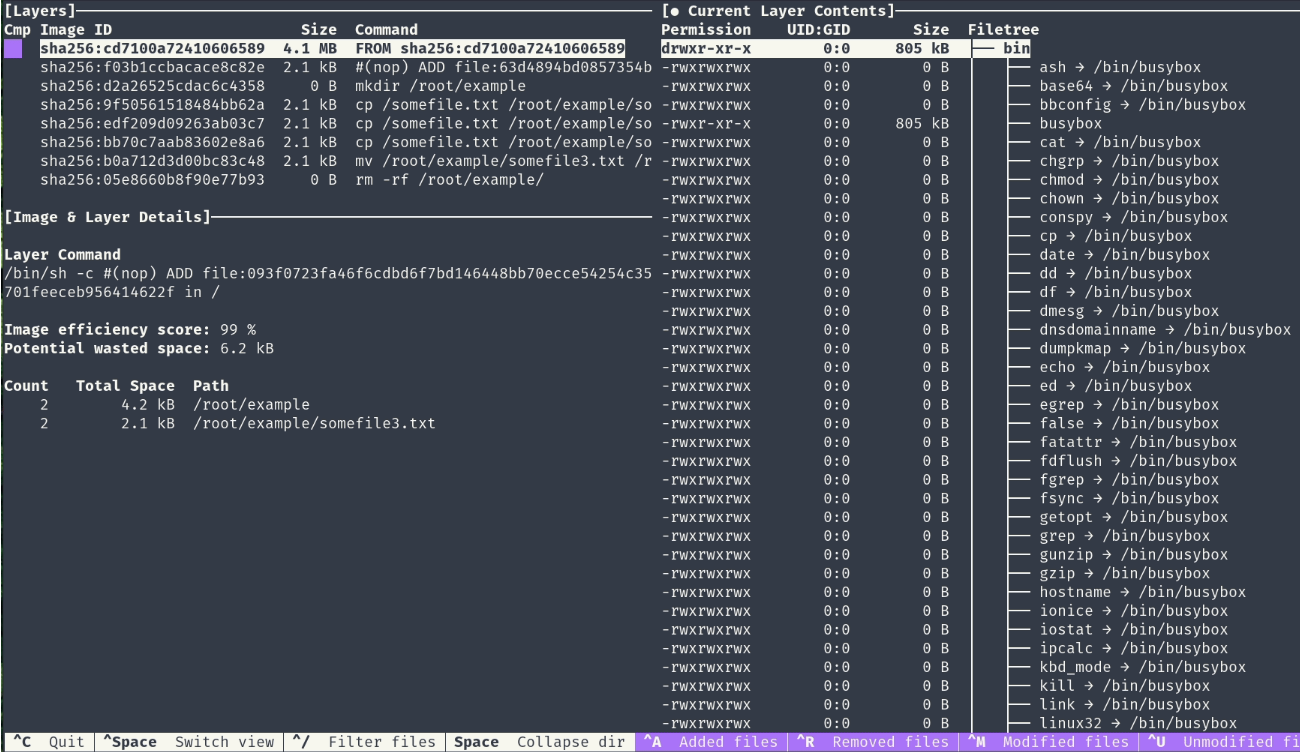
Conclusion
We've discussed quite a few ways to help speed up your builds here. You should be good to go when discussing this topic when the need arises. Be sure to check your existing Dockerfiles!
I hope you found this blog post useful and informative. Thank you for reading! 😊